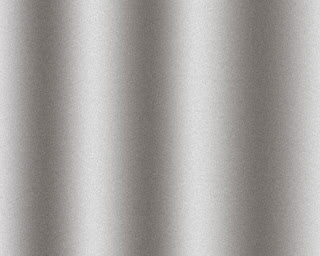
Create a new file (File>New), having 1280x1024 px and 72 dpi. Next applying the Rectangle Tool (U), try to make the background of the picture we want to have in the end.
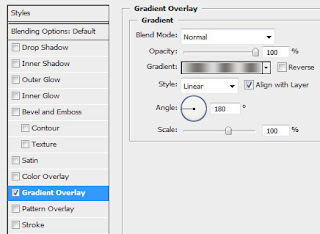
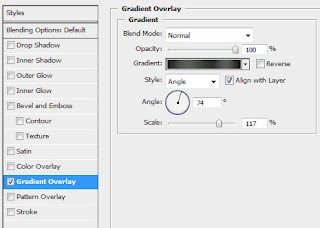
Set the next shown parameters by making a mouse click on the layer we work with on the layers’ palette. Blending Options>Gradient Overlay
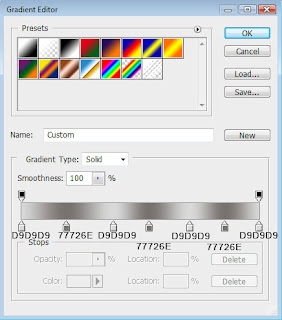
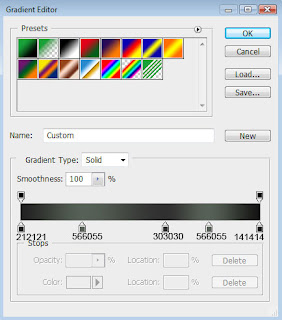
Gradient’s parameters:

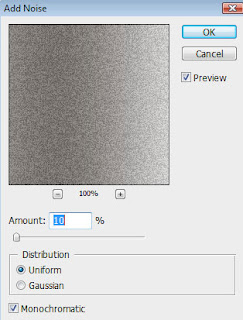
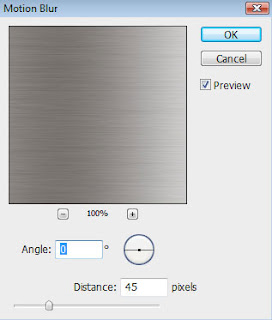
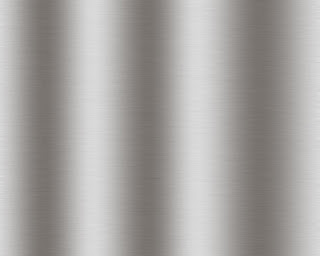
Now we shall set for the background’s layer the next parameter: Filter>Noise>Add Noise
… and also Filter>Blur>Motion blur
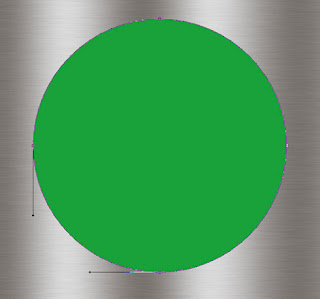
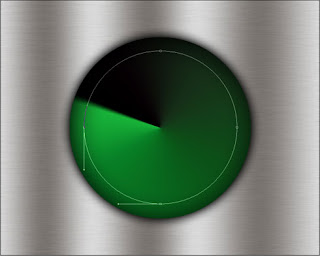
Next step we’ll try to represent a kind of radar panel. For the beginning we’ll use the
Ellipse Tool (U) to make the primary layer of the mentioned element.
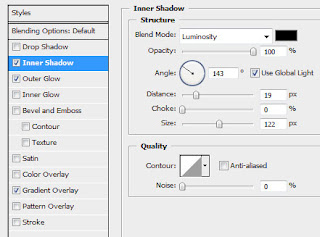
The layer’s parameters: Blending Options>Inner Shadow
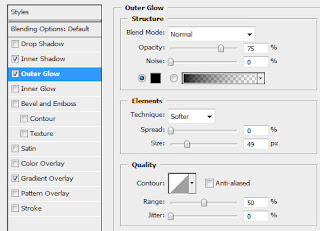
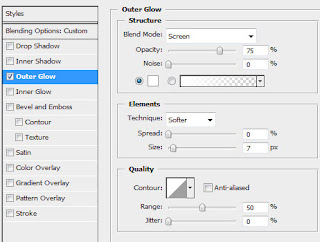
Blending Options>Outer Glow
Blending Options>Gradient Overlay
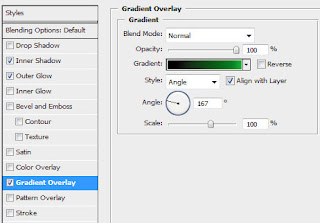
Gradient’s parameters:


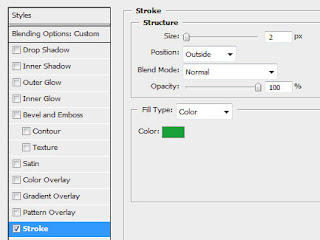
Choosing the same tool, it’s possible to represent the element’s screen:
The layer’s parameters: Fill 0% Blending Options>Stroke
Make five copies of the layer we’ve recently represented and select the Free Transform with Maintain aspect ratio option to press on the copies uniformly by the central direction.

Now, let’s group together all the layers, composing the rounded element (press Ctrl button to mark out the necessary layers and hold on the left mouse’s button while taking the marked layers on Create a new group selection). Marking the group we’ve got, press CTRL+E and apply for the layer the next demonstrated parameter: Fill 46%
Make a copy of the rasterized layer; get back the parameter Fill 100%. Then select the Blur Tool (R) to blur out the marking, placing this layer above the previous one.

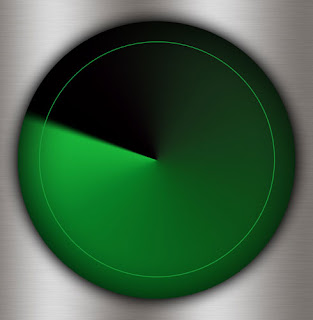
Using the
Line Tool (U), try to make a vertical line, colored with #18A139

Make five copies of the layer containing the vertical line and select after that the Free Transform option to turn over the copies on equal distances relatively to the central part of the picture.

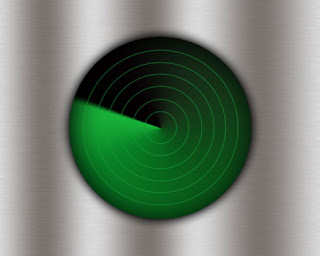
Try to make now a corpse’s frame around the radar’s screen. In this case we’ll use the
Ellipse Tool (U) to represent a circle. Try to make firstly the outside borders and then press Alt button to cut out the middle part of the circle, applying the same tool.
The layer’s parameters: The white color: Blending Options>Bevel and Emboss


Try to make the next corpse’s layer of the radar panel, applying the same method, described above and the same tool too.
The layer’s parameters: Blending Options>Gradient Overlay
Gradient’s parameters:

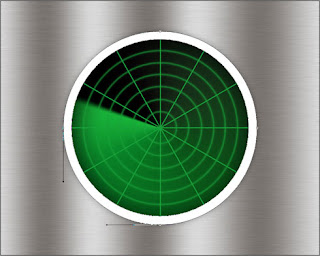
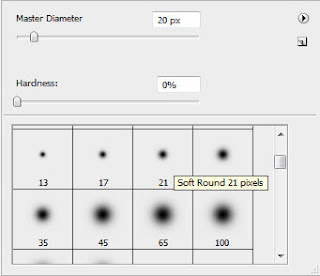
Try to make now several highlights on the radar’s screen. In this case we’ll select a standard brush,
Brush Tool (B), to draw several white dots.
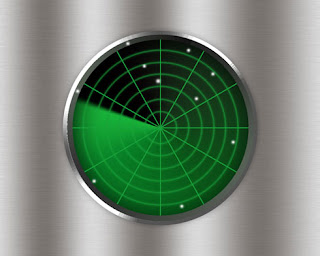
Applying the Smudge Tool (R), try to smudge them on.
Find in Internet a picture representing the white map of the world.
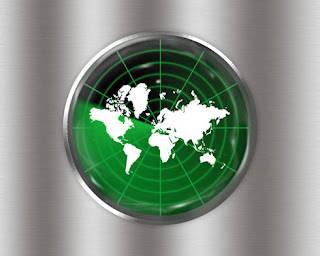
Set the next parameters for the layer containing the world’s map. Blending Options>Outer Glow

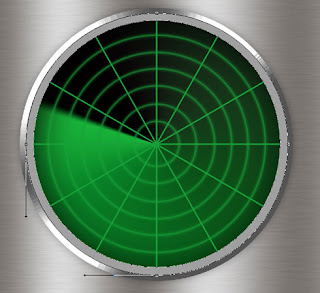
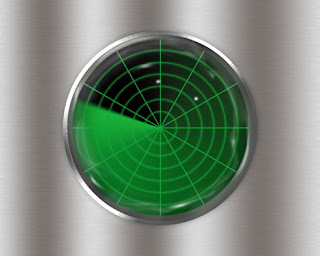
The radar panel is finished!
 Set the next shown parameters by making a mouse click on the layer we work with on the layers’ palette. Blending Options>Gradient Overlay
 Gradient’s parameters:
 Now we shall set for the background’s layer the next parameter: Filter>Noise>Add Noise
 … and also Filter>Blur>Motion blur
 Next step we’ll try to represent a kind of radar panel. For the beginning we’ll use the Ellipse Tool (U) to make the primary layer of the mentioned element.
 The layer’s parameters: Blending Options>Inner Shadow
 Blending Options>Outer Glow
 Blending Options>Gradient Overlay
 Gradient’s parameters:
 Choosing the same tool, it’s possible to represent the element’s screen:
 The layer’s parameters: Fill 0% Blending Options>Stroke
 Make five copies of the layer we’ve recently represented and select the Free Transform with Maintain aspect ratio option to press on the copies uniformly by the central direction.
 Now, let’s group together all the layers, composing the rounded element (press Ctrl button to mark out the necessary layers and hold on the left mouse’s button while taking the marked layers on Create a new group selection). Marking the group we’ve got, press CTRL+E and apply for the layer the next demonstrated parameter: Fill 46%
 Make a copy of the rasterized layer; get back the parameter Fill 100%. Then select the Blur Tool (R) to blur out the marking, placing this layer above the previous one.
 Using the Line Tool (U), try to make a vertical line, colored with #18A139
 Make five copies of the layer containing the vertical line and select after that the Free Transform option to turn over the copies on equal distances relatively to the central part of the picture.
 Try to make now a corpse’s frame around the radar’s screen. In this case we’ll use the Ellipse Tool (U) to represent a circle. Try to make firstly the outside borders and then press Alt button to cut out the middle part of the circle, applying the same tool.
 The layer’s parameters: The white color: Blending Options>Bevel and Emboss
 Try to make the next corpse’s layer of the radar panel, applying the same method, described above and the same tool too.
 The layer’s parameters: Blending Options>Gradient Overlay
 Gradient’s parameters:
 Try to make now several highlights on the radar’s screen. In this case we’ll select a standard brush, Brush Tool (B), to draw several white dots.
 Applying the Smudge Tool (R), try to smudge them on.
 Find in Internet a picture representing the white map of the world.
 Set the next parameters for the layer containing the world’s map. Blending Options>Outer Glow
 The radar panel is finished!
No comments:
Post a Comment